 This post contains affiliate links. All opinions are my own. Please see FCC disclosure for full information. Thank you for supporting this site!
 I didn't grow up eating mushrooms - especially not wild ones. But I do love foraging wild food...and I can't help but get excited about mushrooms; they are fascinating - and so yummy. (A gazillion times better than store bought mushrooms!) Sadly, I haven't had a lot of time for foraging lately, but sometimes God sends you gifts you can't ignore. This weekend was one such time.
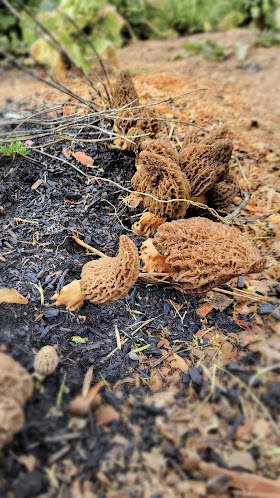
A few weeks ago, I was helping my husband extend the deer fence in our vegetable garden and I noticed a huge mushroom growing near some cabbages. I pointed it out to him and he replied, "Don't touch it! I think those are dangerous!" (He says this about all wild mushrooms and always questions me repeatedly when I feed him any new wild plant. "Are you sure this isn't going to kill me???"). I shrugged it off and went about the business of homesteading. But last weekend, as I was pulling the remaining winter turnips out of the garden, I noticed a cluster of mushrooms growing in one bed. I took some photos because I thought they were interesting.
Not long after, I posted these photos in a plant identification Facebook group. The immediate answers were exciting: "You hit gold!" and "I'm jealous!" were frequent comments. The mushrooms were morels (Morchella esculenta), one of the most sought after and expensive wild mushrooms around. And I found them through dumb luck...
Where to Find Morel Mushrooms
Or maybe not. Because it turns out there's a thing called "Landscape Morels." This is a commentary on where these mushrooms are often found: In gardens where bark mulch has been laid down. My hunch is that last year, when I purchased and hauled in my garden soil, which is rich in native forest bark mulch, some morel spores and mycelium came along with it. So if you laid down wood chips anywhere in your yard last year, it doesn't hurt to check it this spring for any morels that might pop up!
 |
| My landscape morels. |
Now, assuming you can't find landscape morels, you may be able to find morels in an old apple orchard - or in the woods, especially near ash, oak, elm, tulip poplar, maple, pine, sycamore, and hickory trees, as well as around any wild or feral fruit trees. Start looking for them in the early spring; they grow anytime between February to June, depending on where your climate. Early in the season, southward and westward slopes are the best places to look. Later in the season, all slopes are worth checking.
Morels don't like soggy soil that retains water, although they do like to grow along creeks and riverbeds. Morels may be more likely to grow around dead or dying trees - especially those with bark is falling off. (Do note, however, that they don't grow on trees; morels only grow in the ground.) They are also likely to grow in fields of wildflowers, or along the edge of a meadow in the woods. Finally, locations where there was a forest fire, a controlled burn, or a logging operation can be spots to look for morels, especially if a year or two has since passed. This, experts say, is especially true in conifer forests.
 |
| Morels vary in color from tan to dark brown. Courtesy of Wikimedia Commons and Amada44. |
Morels need just the right conditions to grow, experts say. Not only do they need just the right amount of moisture, but they grow best when soil temperatures are around 50 degrees F. and air temperatures are between 50 and 60 degrees F. These weren't the temperatures we were experiencing when I found my morels - but it's still a good basic guideline.
The experts also say that morels grow between 400 and 5,000 feet in elevation, but that you're most likely to find a good number of them at 400 to 6000 feet above sea level.
One final tip: If you find one morel, slow down and look carefully around you. Almost certainly, there are more nearby.
 |
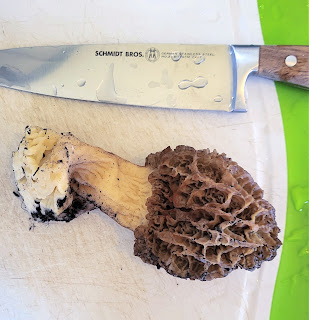
| The largest morel I harvested weighed 4.16 oz., but there were bigger ones I left behind. |
Identifying Morel Mushrooms
Here's the number one thing to know about morels: Yes, there are look-alikes that can make you very, very ill (some even say they can kill you). However, there is one super easy way to distinguish these fungi from a morel: Cut the mushroom in half, lengthwise. A true morel is completely hollow, from cap to stem. The dangerous look-alikes are not fully hollow.
 |
| Morels are completely hollow inside. Courtesy of Wikimedia Commons and Amada44. |
That said, it's important to add: Never eat any wild plant you are not 100% certain you've identified correctly.
Before you cut into a potential morel to check for that hollow center, however, take a good look at it's cap - that's the weird, brain-looking part on top. It should be pitted inwards. With most types of morels, the entire cap is attached to the stem, not hanging free. (There is a "half-free morel," where the cap is only partially attached to the stem; these, experts say, are harder to identify and are outside the scope of this article.) Also, with most types of morels, the cap is noticeably longer than the stem.
 |
| Close up of a morel cap. Courtesy of Wikimedia Commons and Björn S. |
What About False Morels?
Whenever we talk about mushrooms, it's a good idea to discuss the dangers of misidentification. To prevent this problem, first cut the mushroom in half lengthwise. False morels may have air pockets where they are partially hollow inside the stem or cap, but a true morel is completely hollow.
From my research, only two look-alikes can be hollow: The half-morel (Morchella punctipes) and the Wrinkled Thimble Cap (Verpa bohemica). As stated above, half morels' caps are only partially attached to the stem. They are edible, but commonly thought inferior in flavor to true morels. True to their name, Wrinkled Thimble Caps have much smaller caps than true morels. They are edible, but only after long cooking. For photos and more information on these look-alikes, head over to this Wild Foodism's post.
Harvesting Morel Mushrooms
There's a lot of controversy in the mushrooming world about the best way to harvest morels (and mushrooms in general), but most experts say cutting the mushroom off at soil level is best. This helps prevent disruption in the soil, which is not only beneficial to soil health, but helps mushrooms survive year after year. It also tends to help keep the mushrooms cleaner.
Two other rules to live by are to never take more than you can actually use - and always leave some behind. In the case of morels, the fungi spreads both through mycelium (a mass of branched, tubular filaments, akin to roots) and through spores (reproductive cells, akin to seeds). Leaving a healthy number of mushrooms behind means the fungi can reproduce and continue as a healthy source of wild food for you and others.
Although some people like to spread mushroom spores around, thinking this will help the fungi thrive, with morels, most experts say it's probably better to let nature do it's own thing. Morels have to be fully mature and at a certain level of dehydration before their spores will release and be fruitful.
 |
| My morel mushroom harvest. |
Cleaning Morel Mushrooms
Mushrooms tend to get dirty because...well, they grow so low to the ground. You can help ensure cleaner mushrooms by using care as you harvest them. Wipe your harvesting knife off after each harvest, and use an artist's brush or your own clean fingers to whisk off as much soil as possible before putting the mushroom in your harvesting bag or other container.
That said, most experts seem to agree it's a good idea to rinse off your morels. I cut mine in half vertically and rinsed them under cool, running water on both the outside and the inside (where bugs may linger). Only after I did this did I read that some foragers like to capture the rinse water in a container and then spread that water around an area where morels might thrive. The idea is that any spores that end up in the water might produce a new crop. Next time, I'll definitely do this.
As I rinsed the morels, I placed them in a salad spinner and spun them until they looked dry. Then I placed them inside a vegetable storage container, which is vented and designed to keep produce fresh longer. (My containers are older and I can't find them anywhere online, but these produce containers are the same idea.) Do not use an air tight container. If you don't have a produce storage container, place the morels in a paper bag and roll down the top. Store in the refrigerator.
 |
| Cleaned morels in a produce storage container last up to a week in the fridge. |
Mushrooms taste best when they are fresh, so I recommend eating at least some the same day you harvest them. Kept in a produce container, they last up to a week in the refrigerator. If you have more morels than you can eat in that time, consider sharing your harvest, or try your hand at preserving them.
Preserving Morel Mushrooms
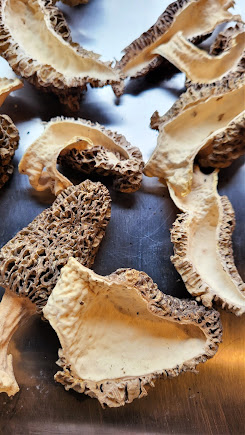
Freeze drying or dehydrating are the two most common ways to preserve morels. To freeze dry them, place clean, halved raw morels (or if you prefer, sliced or chopped mushrooms) on the tray of a home freeze dryer. Pop them in the machine and let it do it's thing. When the machine says the mushrooms are done, pull them out and check them carefully for any cold spots. If there are cold areas, put them back in the machine and freeze dry them a bit longer. Store freeze dried morels in Mylar bags with oxygen absorbers, or (for shorter term storage) in vacuum sealed canning jars containing an oxygen absorber. In Mylar bags, mushrooms will remain shelf stable for at least 20 years (For more information on home freeze drying, see "Freeze Dried vs. Dehydrated Food: What's the Difference?")
 |
| Home freeze dried morels. |
To dehydrate morels, place cleaned, halved (or sliced) raw mushrooms on the tray of an electric dehydrator, making sure the mushrooms aren't touching. Dehydrate at 110 degrees F. until the mushrooms appear completely dry. To check for doneness, break off a thicker piece of mushroom; no moisture should appear at the break. (For a complete guide to using an electric dehydrator, click here.)
If you live in a dry climate, you can try air drying morels. Thread a sewing needle with buttonhole or quilting thread, then run the needle through the stems of halved morel mushrooms, creating a sort of necklace. If you place a knot on each side of every mushroom half, it will help keep the morels from touching each other, which will speed their drying and help prevent rotting or molding. Hang the "necklace" up in a dry location out of direct sunlight. Use the same doneness check as for electric dehydrating.
To store dehydrated morels, place them in a glass jar with an air-tight metal lid. Store in a cool, dry, dark location for up to a year.
I do not recommend oven drying mushrooms; the results will be inferior because an oven is really too hot for the job. If you have an oven warming drawer, you could try using that; see general directions here.
To rehydrate dehydrated or freeze dried morels, pour the desired amount in a bowl and pour room temperature water over them. Allow to sit until the mushrooms are fully rehydrated.
It's also possible to freeze morels. However, if you freeze raw morels, their flavor will dissipate, so first, either boil them or saute them for 5 minutes. Pat boiled mushrooms dry before packaging. Place the prepared mushrooms inside freezer bags, squeezing out as much air as possible, and use within 6 months.
Cooking Morel Mushrooms
Morels have a wonderful, classic mushroom flavor, so they are ideal for a wide variety of dishes, including risotto, quiches, salads, burgers, grits, fried whole or halved, as part of savory sauces, etc.
It is important to note that morels should ALWAYS be cooked before eating them. Consuming them raw causes gastrointestinal distress, diarrhea, and vomiting.
If you've never eaten morels before, it's a good idea to begin with just a small amount. (This is good advice for any new-to-you food.) I recommend sauteing a small amount in butter, then adding a bit of sea salt and pepper. This has the added bonus of letting you experience the special flavor morels have, which will make it easier for you to use them in recipes.
Once we each tried our sauteed morels, I served the remainder of my harvest on pizza and in an egg hash. I plan to use the morels I preserved in stroganoff and Salisbury steak.
Related Articles:
* Cover image courtesy of erin.


No comments